
If you’re having trouble installing Forge Modloader, you’ve come to the right place. In this post, you will learn how to download and install Forge for Minecraft 1.19.4 step-by-step.
To get started, open the Minecraft Launcher. If you haven’t already, you may need to log in. The first thing you want to do is select Minecraft 1.19.4 from the list of profiles. This will download and install Minecraft 1.19.4 to your pc, which is required if you want to install Forge for Minecraft 1.19.4.
Once you’ve selected Minecraft 1.19.4, click Play and wait for the game to launch. Once you’ve made it to the main menu of the game, you have successfully installed Minecraft 1.19.4.
Download and Install Forge for Minecraft 1.19.4
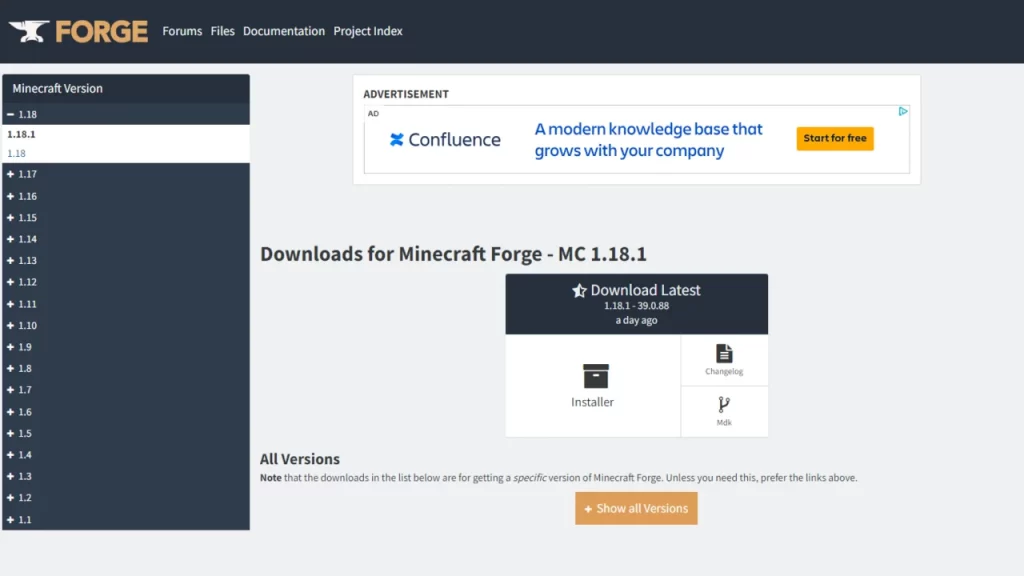
The next step is to download ⬇ Forge Mod loader. Once on this page, click Installer and wait for the timer in the top right corner to count down to 0. Now you will be able to click SKIP and proceed to download the Forge 1.19.4 Installer.
Once this file finishes downloading, you want to try to open it using Java Platform SE binary. For most people this will be selected by default and the installer will just open. If the file does not want to open, we need to fix Java issues. Try downloading the first program called Jarfix. Upon opening this program, it will try to fix .jar files not being opened with Java by default.
If it tells you, “The .jar suffix was registered successfully” you can now open the Forge installer. If it tells you something like “You need to install Java”, do not use the link in the window, use the link below instead. The link in the Jarfix window does not work.
⬇ Java and Jarfix (to fix jar files):
Jarfix 3.0.0: https://johann.loefflmann.net/en/software/jarfix/index.html
Java: https://www.java.com/en/download/
After fixing Java issues with Forge installer, you can now open the installer and click Install, and it will start installing Forge. Once that’s done, open your Minecraft Launcher again. If the Forge installation was successful, you should now see a new Forge profile in the launcher.
Download and Install Mods for 1.19.4
Once you’ve found a mod you want to install, you can proceed to download it from the Download [MOD] for Minecraft version 1.1X.X section. If you’re looking for awesome mods, check out the mods page!
For this tutorial, we will use ⬇ Xaero’s Minimap, which is up-to-date for Minecraft 1.19.4. Once on this page, scroll down to Minecraft 1.19.4 and click the download button.
After five seconds, your download starts, and you will get another .jar file. This time around, don’t open it. After the download is complete, navigate to your search bar and type %appdata% and hit Enter or click search. Doing so should open up a folder with a bunch of other folders in it. Find the folder called .minecraft and open it, this folder is usually at the top of the list. Once in this folder, right click and select Create new folder and call it mods (all lowercase).
If you’ve installed mods before, this folder might already exist. In this case, you want to either back up its contents and then clear all files from the folder, or rename the folder to something like old mods. Forge will only look for the folder called mods when loading Minecraft with mods. Once you’ve created the mods folder, drag in all mods you want in Minecraft. In this case, you’ll want to drag Xaeros-Minimap.jar in to the folder.
You’re done!
That’s it! You can now go back in to your Minecraft Launcher, launch the Forge profile and wait for it to start. Once you’ve made it to the main menu, you should now see a button called Mods which lets you check all mods you’ve installed. Create a new singleplayer world to see the mod in action. Please note: worlds in which mods were used will not be playable without mods afterwards! Do NOT open any of your vanilla Minecraft worlds with mods, as this may break the worlds.


Pingback: Mekanism Mod 1.18.1 – 1.17 > 1.7.2 – MC Mod Spot
Pingback: Oh The Biomes You’ll Go 1.18.2 – 1.17 > 1.12.2 – MC Mod Spot
Pingback: Sodium 1.19 / 1.18.2 > 1.16.5 - MC Mod Spot
Pingback: Physics Mod 1.19 / 1.18.2 > 1.17.1 - MC Mod Spot
Pingback: Optifine 1.19.1 / 1.18.2 > 1.7.2 - MC Mod Spot
Pingback: Tropicraft Mod 1.18.2 - 1.16.5 > 1.4.7 - MC Mod Spot
Pingback: Nature's Compass Mod 1.19 - 1.18.2 > 1.7 - MC Mod Spot
Pingback: Structory Mod 1.19 - 1.18.2 > 1.18 - MC Mod Spot
Pingback: Terralith Mod 1.19 - 1.18.2 > 1.17 - MC Mod Spot
Pingback: Sophisticated Backpacks 1.19 - 1.18.2 > 1.16 - MC Mod Spot
Pingback: Serene Seasons Mod 1.19 - 1.18.2 > 1.7 - MC Mod Spot
Pingback: Straw Golem Rebaled 1.19 - 1.18.2 > 1.14 - MC Mod Spot
Pingback: Chisels and Bits 1.18.2 - 1.17.1 > 1.8 - MC Mod Spot
Pingback: DragonLoot Mod 1.19 - 1.18.2 > 1.16 - MC Mod Spot
Pingback: Distant Horizons Mod 1.19.1 - 1.18.2 > 1.16 - MC Mod Spot
Pingback: Ecologics Mod 1.19.1 - 1.18.2 > 1.18 - MC Mod Spot
Pingback: Artifacts Mod 1.19.2 - 1.18.2 > 1.12 - MC Mod Spot
Pingback: FPSBoost Modpack by Jeikir for 1.19 - 1.19.2 - MC Mod Spot
Pingback: Dynamic FPS Mod 1.19.2 - 1.18 > 1.14 - MC Mod Spot
Pingback: Starlight Mod 1.19.2 - 1.18 > 1.17 - MC Mod Spot
Pingback: Incendium Mod 1.19.2 > 1.18 - MC Mod Spot
Pingback: Wilder Wild Mod 1.19.2 > 1.19 - MC Mod Spot
Pingback: Neat Mod 1.19.2 - 1.18 > 1.7.10 - MC Mod Spot
Pingback: Pipez Mod 1.19.2 - 1.18.2 > 1.16 - MC Mod Spot
Pingback: Better Animals Plus 1.19.2 - 1.18 > 1.12 - MC Mod Spot
Pingback: Beautify Mod 1.19.2 / 1.19.1 > 1.18.2 - MC Mod Spot
Pingback: Enhanced Celestials 1.19.2 / 1.18.2 > 1.16.4 - MC Mod Spot
Pingback: Exotic Birds Mod 1.19.2 / 1.18.2 > 1.7.10 - MC Mod Spot
Pingback: Naturalist Mod 1.19.2 / 1.18.2 > 1.18 - MC Mod Spot
Pingback: Wondrous Wilds Mod 1.19.2 > 1.19 - MC Mod Spot
Pingback: Things Mod 1.19.2 - 1.18.2 > 1.16 - MC Mod Spot
Pingback: Twilight Forest 1.19.2 - 1.18.2 > 1.0.0 - MC Mod Spot
Pingback: Builders Crafts & Additions 1.19.2 - 1.18.2 > 1.15.2 - MC Mod Spot
Pingback: Replay Mod 1.19.2 - 1.18.2 > 1.14.4 - MC Mod Spot
Pingback: MineColonies 1.19.2 - 1.18.2 > 1.10.2 - MC Mod Spot
Pingback: Neapolitan Mod 1.19.2 - 1.18.2 > 1.16 - MC Mod Spot
Pingback: Alex's Mobs 1.19.4 → 1.16 - MC Mod Spot
Pingback: Modern Glass Doors Mod 1.19.4 → 1.14 - MC Mod Spot